
An appointment booking form should help a customer choose a service, share the details you need and confirm the visit without unnecessary questions. For service businesses in the US, UK and continental Europe, clear dates, contact details and location instructions are especially useful when customers use different conventions.
This checklist explains nine fields to review before sharing your booking page. The examples are setup suggestions for salons, consultants and home services, not a requirement to add every field. Accurate Scheduler includes custom fields in Free and paid plans, subject to your plan’s appointment allowance.
1. Give your appointment booking form a clear name field
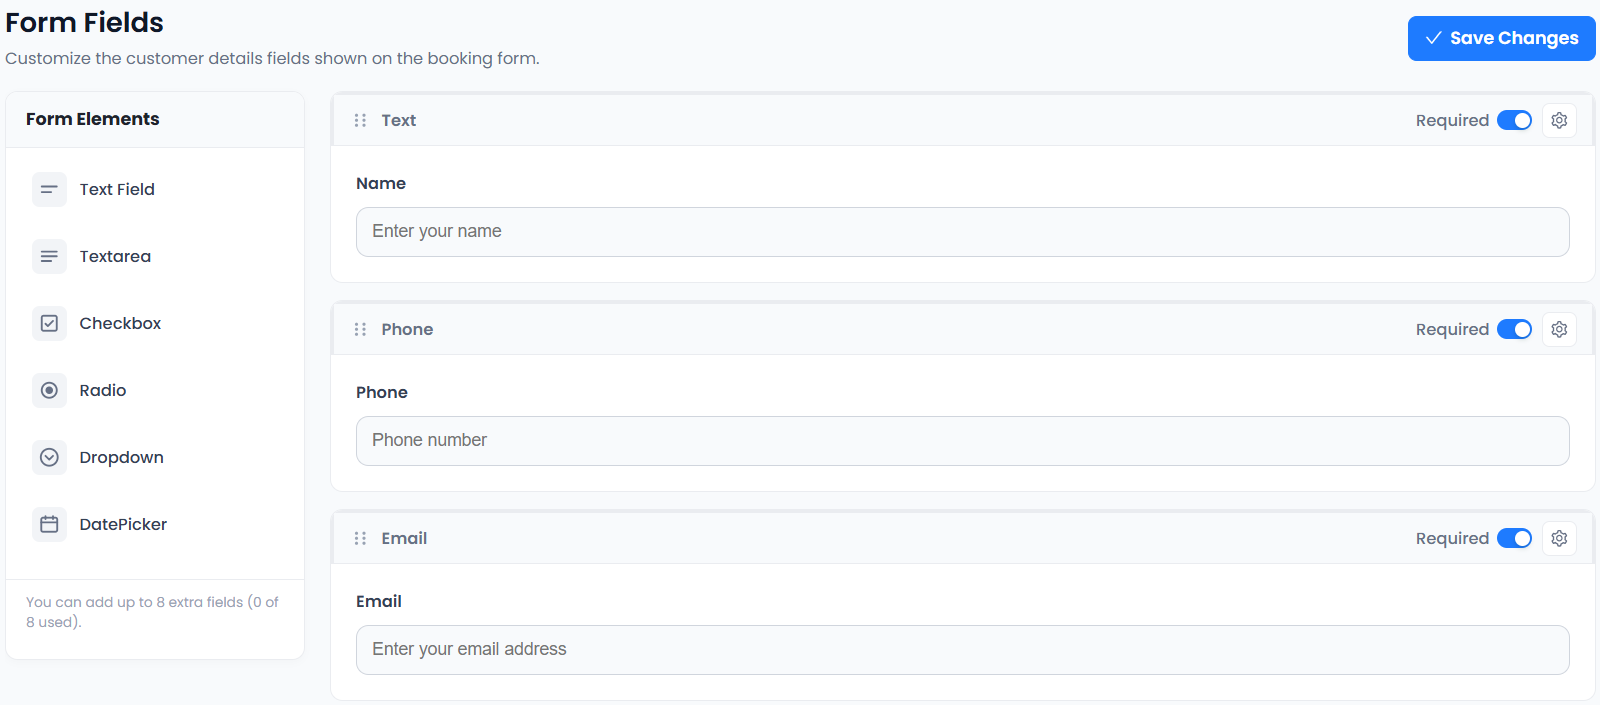
Ask for the name you need to identify the booking. Keep the label visible and avoid assuming every customer has the same first-name and surname structure. If your workflow allows a preferred name, explain when you need it rather than requiring a long personal profile.
Test accented characters and names containing spaces or hyphens in your actual appointment booking form. A business serving clients in Paris, Madrid, London or New York may receive different naming conventions. Check the saved appointment, not just what appears in the text box.
2. Collect an email address for appointment details
Use a clear email label and explain that the address is used for booking information. Check whether your confirmation reaches the intended inbox and whether the customer can find the appointment date, service and contact route in the message.
A successful form submission does not prove an email was received. Make a test booking using an inbox you control, review the actual message and check the spelling of your business details. Avoid treating a booking-email field as automatic permission for unrelated marketing.
3. Make phone-number expectations understandable
If a phone number is needed to deliver the service, explain why. Customers booking across borders may need a country code, such as +1 for the US, +44 for the UK or +49 for Germany. Do not infer the customer’s timezone, nationality or preferred language from that code alone.
Review how spaces and international prefixes are handled in your appointment booking form. Only require a phone number when the service needs it. If you enable WhatsApp Notifications, use your own supported Meta or Twilio setup, approved templates and recipient agreement. WhatsApp Notifications requires a paid plan and provider charges may apply.
4. Explain the selected service and duration
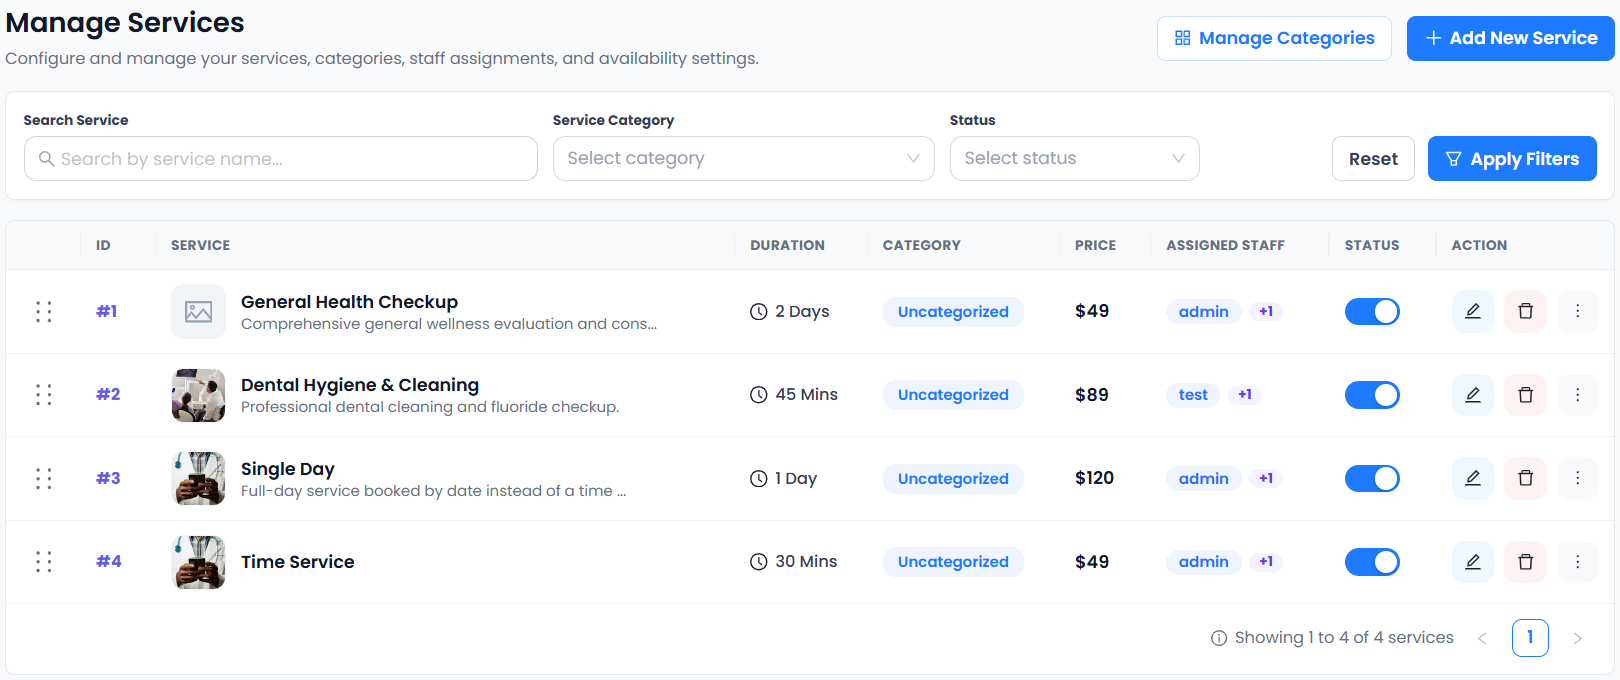
The service choice belongs near the start of the booking journey. Use names that customers recognize: “Haircut and styling,” “Discovery call” or “Estimate visit” is clearer than an unexplained internal service code. Show a duration and price that match your actual configuration.
In an appointment booking form, distinguish a free introductory call from a paid consultation. A customer should not discover a different purpose or unexpected service fee at the final step. Read the service setup guide and paid consultation checklist when building the menu.
5. Match staff selection to the service
Show a staff choice when customers genuinely need to choose a professional. Assign only the staff who provide that service, then test their working hours and holidays. If a customer has no preference, verify the available options in your configured flow before describing automatic assignment.
Accurate Scheduler supports unlimited staff and services on every plan. Managing staff availability is separate from individual Staff Panel access, which requires a paid plan. Check the team scheduling features rather than assuming those capabilities have identical entitlements.
6. Make the date and time unambiguous
A date such as 04/05 can be read differently by US and European customers. Where your controls allow it, use a month name or clearly explain the chosen date format. Review the booking summary and the received confirmation for the same date.
For remote appointments, display and check the timezone that the booking flow actually uses. Do not promise automatic conversion without testing it. For local salon or repair visits, state that the appointment uses the business location’s time if that matches your configuration. Follow the workspace settings guide.
7. State where or how the service happens
Your appointment booking form should distinguish a business address, a customer-site visit and an online meeting. A consultant in Chicago serving a client in Berlin needs different instructions from a salon receiving customers at one address.
Collect a visit address only if you need it for the service. Keep access notes brief and avoid requesting door codes or other sensitive information in a general notes field. For online meetings, test the connected meeting provider and confirm the client can find the intended joining information.
8. Ask one focused preparation question
A short optional question can be more useful than an extensive intake questionnaire. For a consultation, ask what the customer wants to discuss. For a home-service estimate, ask for a brief description of the job. For a salon consultation, ask which treatment the customer wants to explore.
Choose the appropriate custom-field control for the answer. Keep required fields limited to what is necessary to arrange or provide the service. The W3C guidance on labeling form controls explains why clear, associated labels help people understand and use forms. Adding a label alone is not a complete accessibility assessment.
9. Explain the next step before confirmation
Review the appointment booking form summary: service, staff, date, time, duration and price should agree. Place relevant booking terms and your contact route where the customer can find them before confirming. Do not describe a payment, refund or message as successful until you have checked its actual result.
Stripe and PayPal integrations are included in Free and paid plans. Paid plans add other payment integrations, subject to provider eligibility and charges. Follow the payment setup guide and test your supported configuration.
Test your appointment booking form on mobile
Complete the journey using a small screen, keyboard navigation and realistic test details. Look for unclear required fields, truncated labels and an unexpected page jump. Repeat the check after changing fields, language, service prices or staff availability.
Start with the custom-fields documentation, explore live booking demos and use the test-booking checklist. A focused appointment booking form should make the service easier to understand before you add more questions.